![[woa]](https://2img.net/h/i.imgur.com/Ov60ZBH.png?1)


The End School
3 posters
[woa] :: Clan Talk :: Clan Archives
Page 1 of 1

The End School
![]() by Ender Wed May 12, 2010 8:48 am
by Ender Wed May 12, 2010 8:48 am
There comes a time in a sig maker's life when they ask, "what do I want to make of myself?" If you have any sort of passion for your craft, you may think about opening your own sig shop on an established forum, y'know, to get your name out there. You may find stepping into the Pro world to be a scary step, and indeed it can be. When an experienced patron enters your shop, you WILL get one of two possible responses: all out flaming or a sudden devotion to you.
This guide will teach you all of the essentials you have to know to make it the latter.
I will be making tutorial sigs here to show you what not to do and what to do and when in given situations. This tut forum is primarily for Gimp and PS.
I can also offer personal critiques of work if you are so brave.
My lessons will include:
RENDERS
-Making a render
-choosing a render
-what not to do
-Render blending
BACKGROUND
-Making a background
-What not to do
FLOW
-Render placement
-Text placement
-focus techniques
-what not to do
COLOR
-Tone
-Emphasizing Renders
-Blending
-what not to do
TEXT
-Font choice
-font size
-(text placement)
-Font color
-Textual emphasis
-what not to do
C4Ds
-How to use them
-the C4D sig
-what not to do
FINISHING
-Adding a sig to a sig
-Borders
-Exporting to the web
So, stop by here every so often for my continuation of my tutorial.
WANT MORE? HAVE SOME MORE
Last edited by Ender on Wed May 12, 2010 7:00 pm; edited 1 time in total

Ender- Member

- Post Count : 882
Joined : 2009-01-17 -

Re: The End School
![]() by Chu Wed May 12, 2010 5:00 pm
by Chu Wed May 12, 2010 5:00 pm
cool ender, ill be sure to follow your lessons 
this could help me alot
this could help me alot

Chu- Member

- Post Count : 3477
Joined : 2009-10-10
Re: The End School
![]() by cclloyd9785 Wed May 12, 2010 10:04 pm
by cclloyd9785 Wed May 12, 2010 10:04 pm
Im betting people like you and me ender can make a decent living one day with photoshop.
The photography teacher of my school (next to art) said that people who are skilled in computer graphics (photoshop) can make a great living.
The photography teacher of my school (next to art) said that people who are skilled in computer graphics (photoshop) can make a great living.

cclloyd9785- Member
- Post Count : 3713
Joined : 2009-01-18 -
Re: The End School
![]() by Ender Wed May 12, 2010 10:46 pm
by Ender Wed May 12, 2010 10:46 pm
Indeed! The only problem with being a GD is the freelance element to it, so you can make a killing, but who knows what kind of job security you will have?
Still, it is a useful skill to have
Still, it is a useful skill to have
Ender- Member
- Post Count : 882
Joined : 2009-01-17 -
Re: The End School
![]() by cclloyd9785 Thu May 13, 2010 9:45 pm
by cclloyd9785 Thu May 13, 2010 9:45 pm
To me, it seems that GD is like a construction job, you contract into jobs so your in and out constantly.
cclloyd9785- Member
- Post Count : 3713
Joined : 2009-01-18 -
Re: The End School
![]() by Ender Thu May 13, 2010 9:59 pm
by Ender Thu May 13, 2010 9:59 pm
Alright! My first lesson!
The key to any sig should be obvious. I'm not talking focus, I'm talking the obvious: a render. But how do you choose a render to use? And if you can't find one you like, how do you make one?
Let's take a look.
LESSON 1: RENDERS
*How to chose and make them*
What is a render? A render is a cut-out from a larger image with a background, called a "stock." Renders are the primary element in any sig (I will use the official term "tag" from now on instead of "sig") and they can make or break your work. SO MAKE SURE YOU HAVE A GOOD EYE!
When choosing a render you want to make sure of a few things:
1. The render doesn't have a "cut off" area that can't be easily blended (more on that in a later lesson)
2. The render is not distorted. This includes, but is not limited to, being blurry, pixelated, or misshapen.
3. There is nothing infront of the image you may want to render (ie: text) that cannot be removed (more on that in the next lesson: Advanced rendering techniques)
4. The outline of the render is crisp and clear without being grainy or jagged. ABSOLUTELY NO WHITE SPOTS ALONG THE OUTLINE.
check out Planet Renders for many awesome pre-made renders! Or upload your own work for others to rate and use!
And that's about it. There are rules regarding your render when it is in the actual tag, but I will cover that in FLOW.
Now then, how does one make a render?
I'm glad you asked, or rather, that I asked myself that.
I am going to make a render! And guess who it is! That's right, Leon from RE4, one of my favorite games. I started off by doing a simple google search, cruising around until I found a stock I liked.

here it is.
now to open photoshop (in my case, CS1 as I am on my PC).
Step 1
Paste your stock into a new window
step 2
If you see any obvious bold spots, you can use an auto-select tool such as the magic brush or eraser. Be wary about this tool. Too often, novice render makers rely solely on this device. It is indeed useful for eliminating nuances and large areas away from your target render, but it has a bad habit of erasing parts of the render that you don't want it to do and it almost always leaves an unseemly jagged edge to the render. You can alter the "feather" and "tolerance" levels to prevent this as they remove jags and restrict the tool to certain colors respectively for a more accurate cut.
I, for one, prefer to kick it old-school: the eraser tool. This is a even more appealing choice to me as I have a drawing tablet, which allows for sharp precision, but a mouse works fine too.
Image
The magic brush has erased my selection after pressing "delete." For an easy de-select, press control D.
It is a good idea to add a layer beneath your rendering layer that is a bold, contrasting color so you can see what you are doing. Also keep another layer above your rendering layer that is the stock image so you can check your work. If you get to a certain benchmark in your render that you wish to "save your progress" at, you can make a copy layer our of your current render and then continue, reverting back to the copy if you mess up.
Even this seemingly clean cut has left a jagged edge. Notice it in green.
Step 3
Another helpful trick is to add a stroke effect to your rendering layer (done with layer>layer style>stroke, or the little "f" button at the bottom of the layers window). This allows you to see if you have gotten the eraser as close to the render as possible and it also detects any lose pixels.
WARNING!:
You may be tempted to keep using the magic tools, but look what it does here; a seemingly clean cut leaves subtle mistakes! Always be wary!
Can you spot the error here?
Hmmmmm
Step 4
You can use the blur tool at about 50% to get rid of those unseemly jagged edges you may get. Anyway, time to chose you eraser tool and get crackin'! Hey, you want a render, so work for it! Make sure the settings are like the ones here so you get a smooth, pressure sensitive flow.
I like an eraser size between 5-9 pixels in diameter.
LET'S GO!
Now just erase around the image as close as possible. When in comes to small jagged parts like Leon's hair here, just do a rough cut out like this and then blur it a bit to make it seem like one, smooth piece.
Hair Gelllll
Keep doing this until you have finished your cut out!
CHECKING YOUR WORK:
Uh-oh...was I supposed to erase here? When you are zoomed way up close trying to erase, pixels can look the same and you may lose the outline of your character entirely! In this case, you can either compare the original image with the render side-to-side or make the hidden "stock" layer you made earlier visible so that you can quickly see the differences.
2 windows
Uh-oh...
phew!
Alternate method: Instead of using the eraser, the PHOTOSHOP pen tool and a lasso tool can work wonders. If you trust your hand, try doing a free lasso tool, but I reccomend the polygonal tool where you click to add points that makes a vector, you can trace the image with this and then make the whole thing your selection. Press shift+ctrl+I to inverse your selection and press delete to save only your render character. The touch it up where needed.
Press and hold SHIFT to force the lasso to make straight line
press and hold ctrl to make your next click end your selection line
lasso
SURVEY!
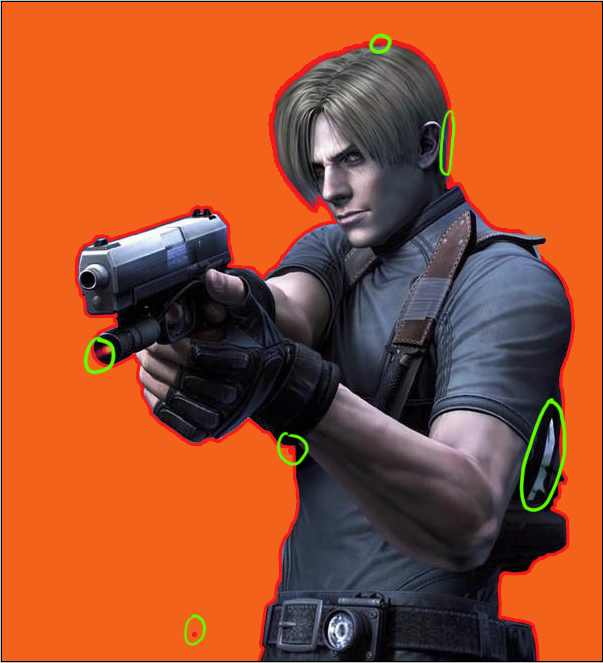
Now you have finally finished. Step back and survey your work for mistakes. In green I have circled a:
-missed pixel
-subtle jagged edge (under his wrist, notice the stroke line here is not even)
-cut-off point (where is that laser going?)
-missed area of backgroun
-choppy bit of hair (technically correct rendering, but people who have not seen the stock will not know this and think it is messy)
-a subtle blue outline (back of the head, looks bad in front of a dark background)
it helps to check your work even more by setting the render against your stock and a black background, flashing between them to see any mistakes.
Finally!
Final product
Here is the finished render. Normally, you will not have a black BG as I do here, but a clear one. I kept it as black to show you the outline better. Now you add your sig (name) to the render so people can't claim your work so easily, and you can upload it to planet renders!
Notice that I fixed my image with the blur tool, eraser, and for the laser on the gun, the smudge tool at about 80%, using it to smudge color from the surrounding barrel to cover the protruding red light. If you want, you can keep the entire laser in the render.
Alright! Now save it as a GIF, JPEG, or PNG and save it forever!
Until next time, happy rendering!
The key to any sig should be obvious. I'm not talking focus, I'm talking the obvious: a render. But how do you choose a render to use? And if you can't find one you like, how do you make one?
Let's take a look.
LESSON 1: RENDERS
*How to chose and make them*
What is a render? A render is a cut-out from a larger image with a background, called a "stock." Renders are the primary element in any sig (I will use the official term "tag" from now on instead of "sig") and they can make or break your work. SO MAKE SURE YOU HAVE A GOOD EYE!
When choosing a render you want to make sure of a few things:
1. The render doesn't have a "cut off" area that can't be easily blended (more on that in a later lesson)
2. The render is not distorted. This includes, but is not limited to, being blurry, pixelated, or misshapen.
3. There is nothing infront of the image you may want to render (ie: text) that cannot be removed (more on that in the next lesson: Advanced rendering techniques)
4. The outline of the render is crisp and clear without being grainy or jagged. ABSOLUTELY NO WHITE SPOTS ALONG THE OUTLINE.
check out Planet Renders for many awesome pre-made renders! Or upload your own work for others to rate and use!
And that's about it. There are rules regarding your render when it is in the actual tag, but I will cover that in FLOW.
Now then, how does one make a render?
I'm glad you asked, or rather, that I asked myself that.
I am going to make a render! And guess who it is! That's right, Leon from RE4, one of my favorite games. I started off by doing a simple google search, cruising around until I found a stock I liked.
here it is.
now to open photoshop (in my case, CS1 as I am on my PC).
Step 1
Paste your stock into a new window
step 2
If you see any obvious bold spots, you can use an auto-select tool such as the magic brush or eraser. Be wary about this tool. Too often, novice render makers rely solely on this device. It is indeed useful for eliminating nuances and large areas away from your target render, but it has a bad habit of erasing parts of the render that you don't want it to do and it almost always leaves an unseemly jagged edge to the render. You can alter the "feather" and "tolerance" levels to prevent this as they remove jags and restrict the tool to certain colors respectively for a more accurate cut.
I, for one, prefer to kick it old-school: the eraser tool. This is a even more appealing choice to me as I have a drawing tablet, which allows for sharp precision, but a mouse works fine too.
Image
The magic brush has erased my selection after pressing "delete." For an easy de-select, press control D.
It is a good idea to add a layer beneath your rendering layer that is a bold, contrasting color so you can see what you are doing. Also keep another layer above your rendering layer that is the stock image so you can check your work. If you get to a certain benchmark in your render that you wish to "save your progress" at, you can make a copy layer our of your current render and then continue, reverting back to the copy if you mess up.
Even this seemingly clean cut has left a jagged edge. Notice it in green.
Step 3
Another helpful trick is to add a stroke effect to your rendering layer (done with layer>layer style>stroke, or the little "f" button at the bottom of the layers window). This allows you to see if you have gotten the eraser as close to the render as possible and it also detects any lose pixels.
WARNING!:
You may be tempted to keep using the magic tools, but look what it does here; a seemingly clean cut leaves subtle mistakes! Always be wary!
Can you spot the error here?
Hmmmmm
Step 4
You can use the blur tool at about 50% to get rid of those unseemly jagged edges you may get. Anyway, time to chose you eraser tool and get crackin'! Hey, you want a render, so work for it! Make sure the settings are like the ones here so you get a smooth, pressure sensitive flow.
I like an eraser size between 5-9 pixels in diameter.
LET'S GO!
Now just erase around the image as close as possible. When in comes to small jagged parts like Leon's hair here, just do a rough cut out like this and then blur it a bit to make it seem like one, smooth piece.
Hair Gelllll
Keep doing this until you have finished your cut out!
CHECKING YOUR WORK:
Uh-oh...was I supposed to erase here? When you are zoomed way up close trying to erase, pixels can look the same and you may lose the outline of your character entirely! In this case, you can either compare the original image with the render side-to-side or make the hidden "stock" layer you made earlier visible so that you can quickly see the differences.
2 windows
Uh-oh...
phew!
Alternate method: Instead of using the eraser, the PHOTOSHOP pen tool and a lasso tool can work wonders. If you trust your hand, try doing a free lasso tool, but I reccomend the polygonal tool where you click to add points that makes a vector, you can trace the image with this and then make the whole thing your selection. Press shift+ctrl+I to inverse your selection and press delete to save only your render character. The touch it up where needed.
Press and hold SHIFT to force the lasso to make straight line
press and hold ctrl to make your next click end your selection line
lasso
SURVEY!
Now you have finally finished. Step back and survey your work for mistakes. In green I have circled a:
-missed pixel
-subtle jagged edge (under his wrist, notice the stroke line here is not even)
-cut-off point (where is that laser going?)
-missed area of backgroun
-choppy bit of hair (technically correct rendering, but people who have not seen the stock will not know this and think it is messy)
-a subtle blue outline (back of the head, looks bad in front of a dark background)
it helps to check your work even more by setting the render against your stock and a black background, flashing between them to see any mistakes.
Finally!
Final product
Here is the finished render. Normally, you will not have a black BG as I do here, but a clear one. I kept it as black to show you the outline better. Now you add your sig (name) to the render so people can't claim your work so easily, and you can upload it to planet renders!
Notice that I fixed my image with the blur tool, eraser, and for the laser on the gun, the smudge tool at about 80%, using it to smudge color from the surrounding barrel to cover the protruding red light. If you want, you can keep the entire laser in the render.
Alright! Now save it as a GIF, JPEG, or PNG and save it forever!
Until next time, happy rendering!
Last edited by Ender on Tue Mar 22, 2011 4:18 pm; edited 1 time in total
Ender- Member
- Post Count : 882
Joined : 2009-01-17 -
Re: The End School
![]() by cclloyd9785 Thu May 13, 2010 10:27 pm
by cclloyd9785 Thu May 13, 2010 10:27 pm
NOTE: to PS CS5 Users: Use the quick selection tool to help you do broad areas at a time. If u accidently select too much, at the top just hit subract from selection instead, and hover over the places u dont want to select.
cclloyd9785- Member
- Post Count : 3713
Joined : 2009-01-18 -
Re: The End School
![]() by Ender Thu May 13, 2010 10:28 pm
by Ender Thu May 13, 2010 10:28 pm
thank you, lloyd. I would have mentioned that, but I didnt think many people had cs5...?
Ender- Member
- Post Count : 882
Joined : 2009-01-17 -
Re: The End School
![]() by cclloyd9785 Thu May 13, 2010 10:30 pm
by cclloyd9785 Thu May 13, 2010 10:30 pm
like 4 or 5 people at least have the trial on the cbox. Me and slick have full version.
cclloyd9785- Member
- Post Count : 3713
Joined : 2009-01-18 -
Re: The End School
![]() by Chu Thu May 13, 2010 10:37 pm
by Chu Thu May 13, 2010 10:37 pm
awesome trial ender
hmm ill practice making a render a few times before i do anythign else
hmm ill practice making a render a few times before i do anythign else
Chu- Member
- Post Count : 3477
Joined : 2009-10-10

 Similar topics
» School I'z ova :D
» First Day of School
» School for me has come
» at school comp
» Last day of school
» First Day of School
» School for me has come
» at school comp
» Last day of school
[woa] :: Clan Talk :: Clan Archives
Page 1 of 1
Permissions in this forum:
You cannot reply to topics in this forum|
|
|